Welcome!

This is the place I try to make my creative visions match the physical world.. watch while I sometimes fail and sometimes succeed!

Thursday, October 24, 2013

Finished Freakshow Quilt


Finished project


To see the history of this quilt project see Freakshow Quilt which tells how I started this quilt. This was a long journey, and I still need to go back and patch a few spots where the material frayed a bit on washing. I can't say how much I learned making this quilt! PS. the name Freakshow came about because this is a suzuki samurai 4x4 but the motor is a toyota.


Casey, pretending to be a cat.

More Odds and Ends

A few more odd's and ends projects. Some tooth fairy pillows I made for a friend of mine... needs some tweaking though, as I'm not liking the lips. The lips hold the tooth/change and they may not be strong enough if one was to use all change.. but who am I kidding, aren't kids getting bills these day instead of the quarter we got growing up?
These are a bit girly as well. I'd love to figure out something a bit more masculine. Perhaps something with wire in the wings so they aren't so frilly!

I'm also working on some project bags for a friend (shhhhh it's a secret) who I'm going to visit in November. She knits up a storm but having some bags to protect the wool projects from fading and dust is important. Apparently knitter's work on multiple projects too! I feel a bit less guilty about my many projects!


I also spent 8 weeks or so attending an agility course with Tucker, the wonder dog. He excelled at the class, but he was actually to fast and we actually had to work on slowing him down. And as a fat lady, I could not.keep.up. But still so much fun. If you have the chance, join agility! There were all kinds of dogs, from small fluffy puppies to old fat labs!


Wednesday, October 23, 2013

A Few Odds and Ends

A few random projects to catch up on. While out quadding, Todd found this antler and brought it home. Casey promptly hid. For some reason she's terrified but fascinated with any antlers. I eventually decided to mount it on a plaque after seeing something on pinterest.


I found the wood plaque at Michaels for a few dollars and Todd helped me drill a hold into the antler so it wouldn't split when I screwed it onto the plaque. He's very helpful that way! I then sprayed the whole thing white. He doesn't understand this as he likes things 'natural' - but he still goes along with my ideas :)


This now hangs in the bedroom where I promptly hung one of Todd's hats off an antler. This adds to our slightly 'country' decor in the bedroom. I'm not really into country per se, but we have three cross stitches that Todd's mom made for us (two wolves and an Indian chief) and some other objects.. it's *very* loosely country, and I think of it more of outdoorsy.


I also redid an old farm desk, that weighs about three million pounds (according to *some* people haha) and seems to be made of old doors. I color matched an old can of paint that had gone 'funny' and I'm loving it! It's very deep, and while sewing there is ZERO desk movement!


 The light is not very good in this picture, but the shelf in the picture below is the same color of glossy grey.


A product I like a lot is the Dritz Yellow Marking Pencil.  I have been through so.many.pencils.
Seriously, I have probably 10-15 different pens and pencils. And some of them are ok. The Nancy Zieman washable felt (I think it's by Clover) is alright, but the ends tend to get funky and you can't iron over top as it might not wash out afterwards. The Dritz pencil marks so clearly and tends not to fade after being handled. I don't like the fact that the 'lead' seems to break so often after sharpening but hey, I've found that problem with normal pencils and pencil crayons as well! I recently picked up the dark colored pencil and that seems to be working well too!


Third Time's the Charm!

Well after attempting to do photo transfer using three different methods, the third time's the charm. I had success with the Bubble Jet 2000 solution and printing directly onto the fabric. I had to work a bit to get the fabric to run through the printer. I had ironed the fabric to freezer paper, but I found I had to tape it to a piece of paper as well. On top of that, I could only print one photo per piece of fabric as when I attempted to print two on one sheet, the first one always screwed up, either going through the printer, or the ink.
I've washed the photos a few times now and the fading is really minimal. I'm impressed and I can foresee some exciting projects using this method (I also have a lot of liquid left I don't want to waste!)


(not sure why these shots are blurry, but my lighting was a bit dodgy!)
(and I think the blanket needs to be ironed!)


My photos aren't really doing the job - the photos in the quilt look MUCH better then my previous attempts.


These two above show the previous attempts


Monkey Love! I just have one line of sewing to fix up and then I'll be mailing it! Well this has been quite an adventure experimenting with photo transfer. My conclusion is I would definitely make one again using my final method, the Bubble Jet 2000 solution!


Monday, May 20, 2013

New Project - It's ON!

While the garden quilt is ongoing I did start a new project that is very exciting (at least to me!)

First though, I have ordered some fabric online and am very excited about the architextures line - of course I WORK in architecture and interior design, so this is not surprising! see fabric here
I also ordered two fun charm packs Reunion by Moda and Glamping by Moda.


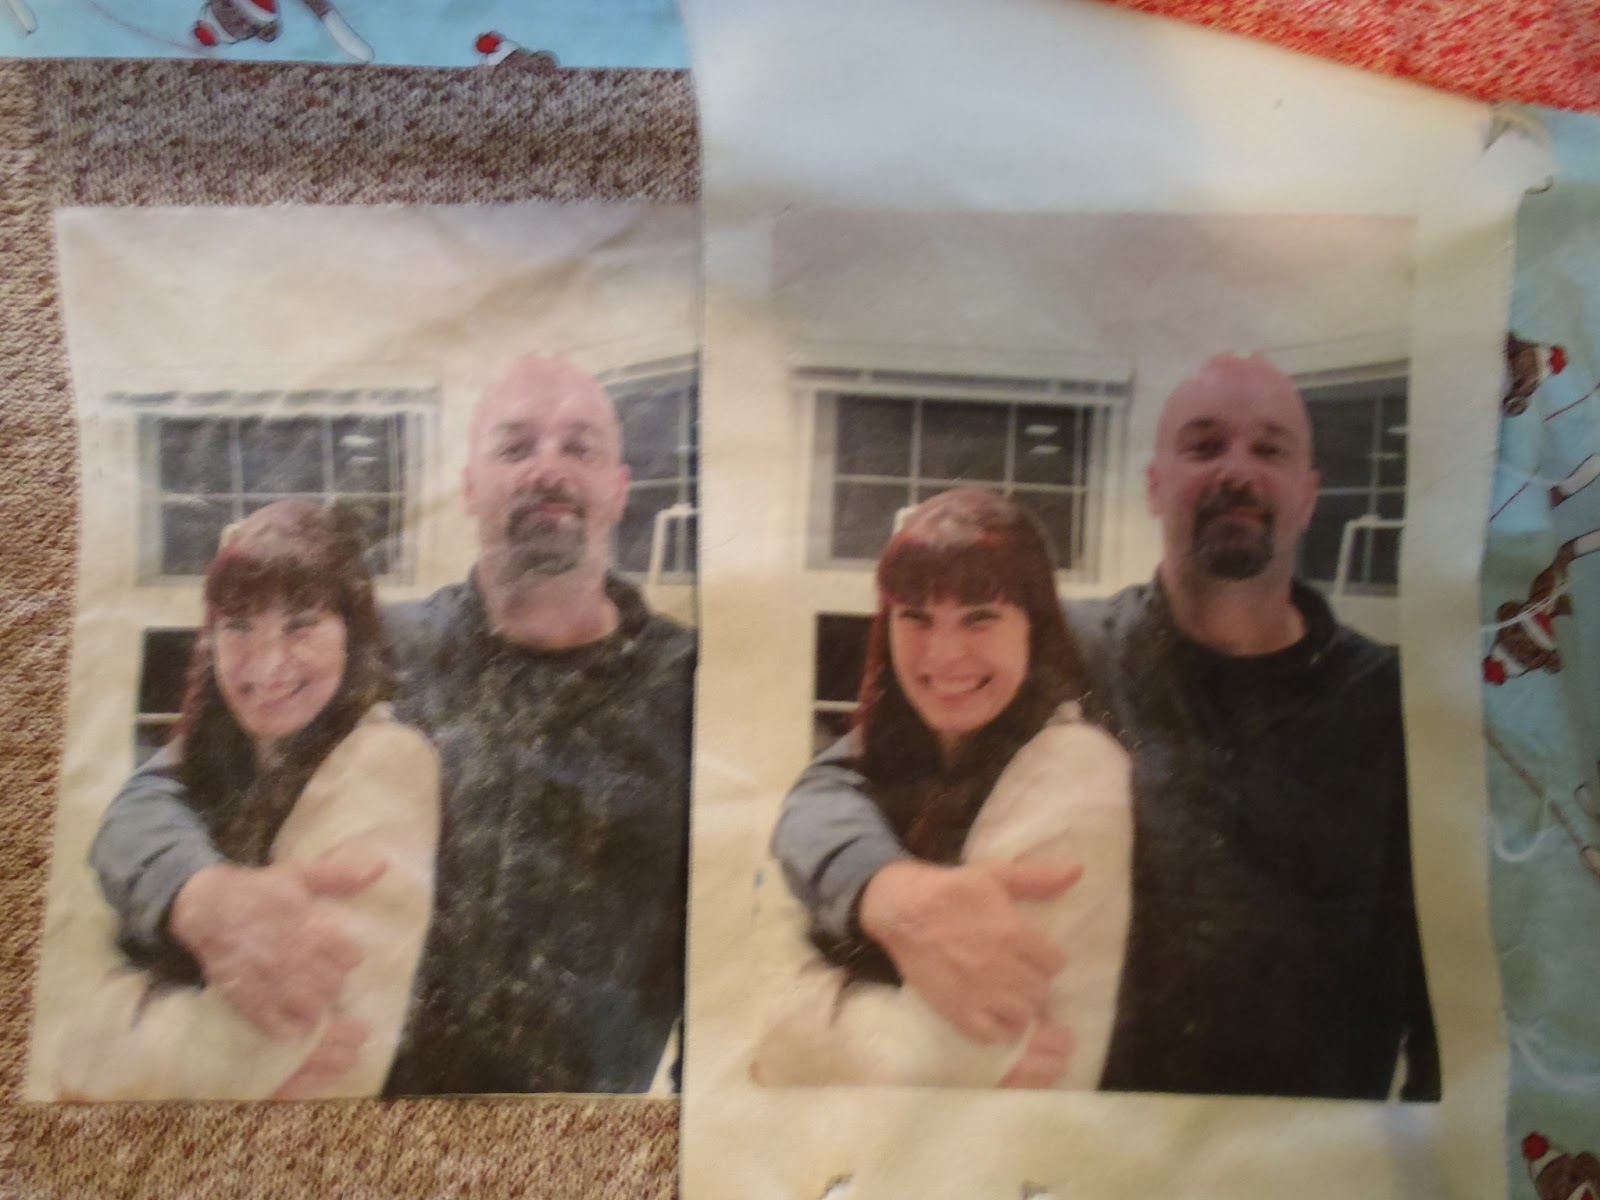
So the new project is something I started many years ago. Todd owns a 4x4 samurai that is very identifiable as owned by him amongst a large group of people. Years ago I took one of his favorite photos of the samurai and using a program called  Quilt Assistant I attempted to make a quilt pattern out of the photo. It took many many hours of work and there were a lot of pieces. When I finally finished I printed out all the pieces (at my work printer tee-hee!) and then after I cut out all the pieces I discovered something was wrong with the numbering of the pieces. I was depressed and put it aside.
Shortly after we moved up north and gave the truck to a good friend of ours who needed a vehicle and who also built most of the samurai. I gave up on the project entirely, as what was the point?
Fast forward to last year when the friend didn't need the samurai anymore and we took it back. Todd had missed it to much and we decided we were never getting rid of it again. And with that my project was back online. In the time I had not looked at the program, the author of the software had updated the issues I had and fixed them so I reprinted everything and I was off to the races!

original photo

using the program software


Now the only issue I am having is keeping it a secret from you-know-who - he never comes into my sewing room unless I have this project out! -sigh! and also, there are many greys and black shades in this project and it's needed some adjustments to get rid of the many shades.. I just can't find that many shades!

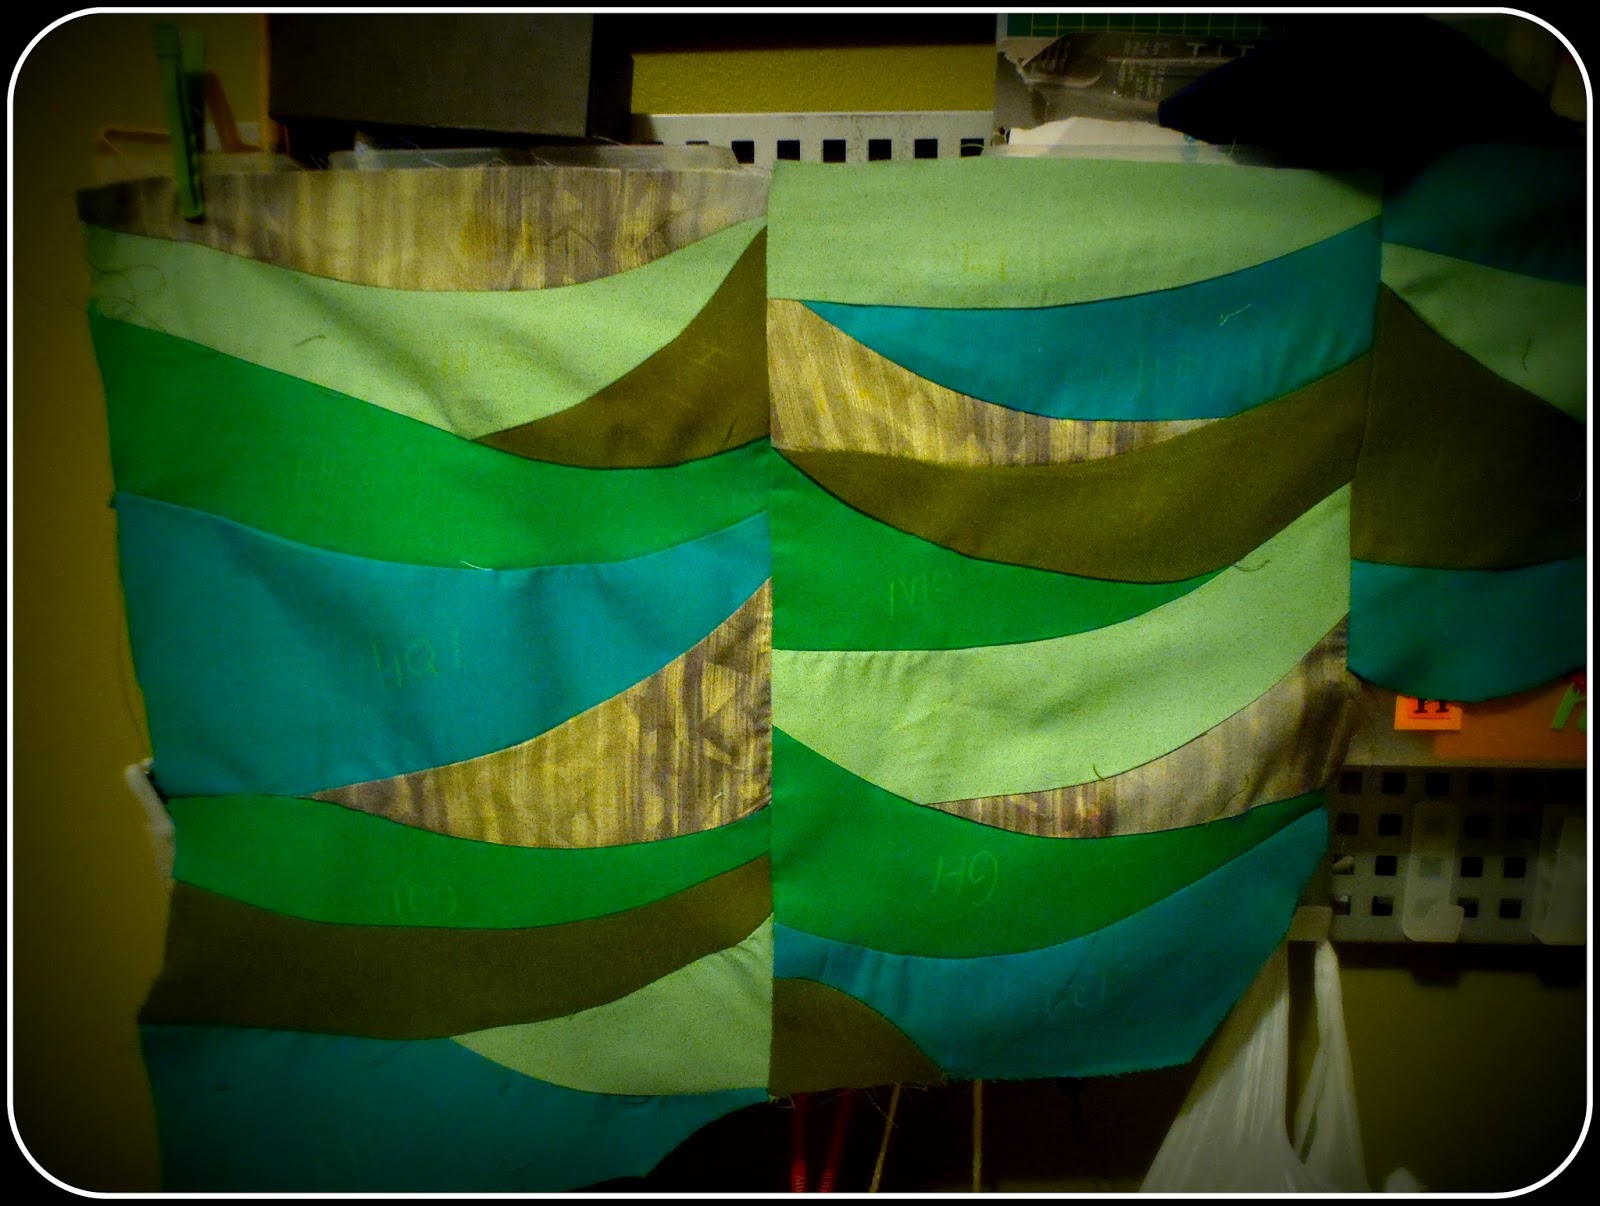
So far, I've done the trees in the background and now I'm working on the truck!


Hands down, this is the hardest quilt I've done, but I'm also learning more skills then I can believe. I've sewn curves together, I've done paper piecing, I'm sewing directly onto black fabric to show motor parts underneath with the intention of going over it with black wool to make the pieces stand out in a sea of black. I've had to squeeze in some pieces where things did not look correct or something didn't fit right (oops!)
I'll get it eventually!

Sunday, April 28, 2013

Ghastlies Finally

So after pushing through an exhausting morning, I finally finished quilting my Ghastlies quilt!
I never intended for the quilt to be this big, I just happened to find a sheet at Walmart in the discount section and then the blocks just started happening (seriously, by themselves!)
I had help with basting it and discovered I was probably a bit to small on the backing side and was wondering how to deal with it.. then I thought, why not just use the excess from the front as the binding?


So I folded it over carefully, ironing it like it was a binding and then sewed the whole binding by hand, front and back. This looks crooked but it's just the fabric angling back.
I used a different batting in this one. It was lighter and "fluffy" and shed all.over.the.fabric. Very annoying and I kept having to delint every time I started a new section. In fact, pulling the needle through would often bring tufts of cotton up (notice in the top right of the above photo)
I still need to go back and trim threads and see if I can get rid of these tufts!

But the final product!


Somebody was glad that I was finally done quilting the blanket, because he desperately wanted to lay on it!

Photo Transfer Paper

So after working my butt off and making what I think is the best quilt I've made so far - I'm left feeling very disappointed in the TAPS photo transfer paper. I did everything as instructed and after quilting the top, decided to wash it - twice - to make sure the photos didn't fade.
Yep. Faded. To the point I felt I could not use the quilt.

I left it sitting for a few days, pondering just replacing the photos with fabric (ugh!) and decided to try t-shirt transfer paper. I got the Staples brand and printed them out. The photo quality was amazing! Clear and bright colors. I ironed them on as instructed, and then washed them and they turned out okay.

On the left is the TAP product, the right is Staples t-shirt transfer. The difference at this point was amazing, and I had high hopes (apple pie in the sky hopes as it turned out!)

Then Later after I finished quilting everything I decided to wash it one more time and this time.. cracking.. and some of the detail washed away.
So depressing. In the meantime I have already contacted my friends sister about mailing the quilt down (I just KNEW I should have waited) and now it's back to a crappy looking quilt again.
Here is the Staples product after washing a second time. On both of these I used 100% cotton and followed the directions exactly.

So last ditch effort. I will invest in some bubble jet set and print directly onto fabric. Very frustrating and I think I might write each of these companies and complain. I've wasted a lot of money and time working on these photos!

Stay tuned for my final attempt at a photo memory quilt!

Tuesday, April 16, 2013

Spider Web Quilting

I had to pause quilting my large garden quilt as I ran out of trace paper.. and it's impossible to find in this small town! I ordered some online but in the meantime I started quilting my Ghastlies Quilt!


Sunday, April 14, 2013

Memory Quilt

A friend of ours passed away from pancreatic cancer last month. He had many friends, and was a generous and kind soul. I can't think of anyone who didn't like him. Often we would go for lunch as he worked nearby to my office and when he phoned me last summer to let me know I was shocked.
He was married for twenty-three years and had a young son. I can't even imagine how difficult this has been for them. Unable to travel down to see him before he died, or go to his celebration of life this weekend, I was inspired to make a quilt for his son.


I ordered some photo transfer paper - TAPS by Lesley Riley
Lesley's Website

It was a fairly easy process printing out the photos. Through trial and error I learned that if you're ironing more then one thing at a time, wait for the ironing board to cool down. Also, I had way more luck when I let the iron rest lightly on the transfer and kept it moving all the time until the paper peeled itself off.

I've got some stuff to help set photos and fabric, I'm really hoping that the photos come through the wash cycle in good shape (don't ask what I'll do it they don't!)

My choice of fabric had to do with my friends love of sock monkeys!


I will machine quilt in the ditch with some cyan colored thread, the back with be the brown fabric and I will bind it with the same brown 'sock' material. I kind of think of this as a memory blanket his son can sleep with - like sleeping with his dad!


Goodbye my friend...