Welcome!

This is the place I try to make my creative visions match the physical world.. watch while I sometimes fail and sometimes succeed!

Friday, February 24, 2012

Roman Blinds

So we've struggled with window coverings for house (well I've struggled anyway!)
None of the windows had window coverings, not even curtain rods. The temporary fix was sheets from a used store in town, cut to fit the windows and hanging from the ceilings (because after all the painting I've done, there will be no holes in these walls unless to it's to hang the real curtains!)
I waffled between curtains and blinds or shades. Usually curtains would be the cheaper option IF we had rods, but buying rods and curtains ends up being the same price as the blinds. We have decided on blinds but budget-wise  we'll have to wait awhile longer.... except... I can't stand how bright the bedroom is at night.

It's odd, we moved up north and people kept telling us about the lack of light during the winter, but it's almost always clear skies up here which equals nights that are oddly bright, lit by stars and northern lights!

So there I am, looking on pinterest and I see someone has made a roman blind out of an old mini blind and I'm struck with the idea of doing this for our bedroom!

What was I thinking????

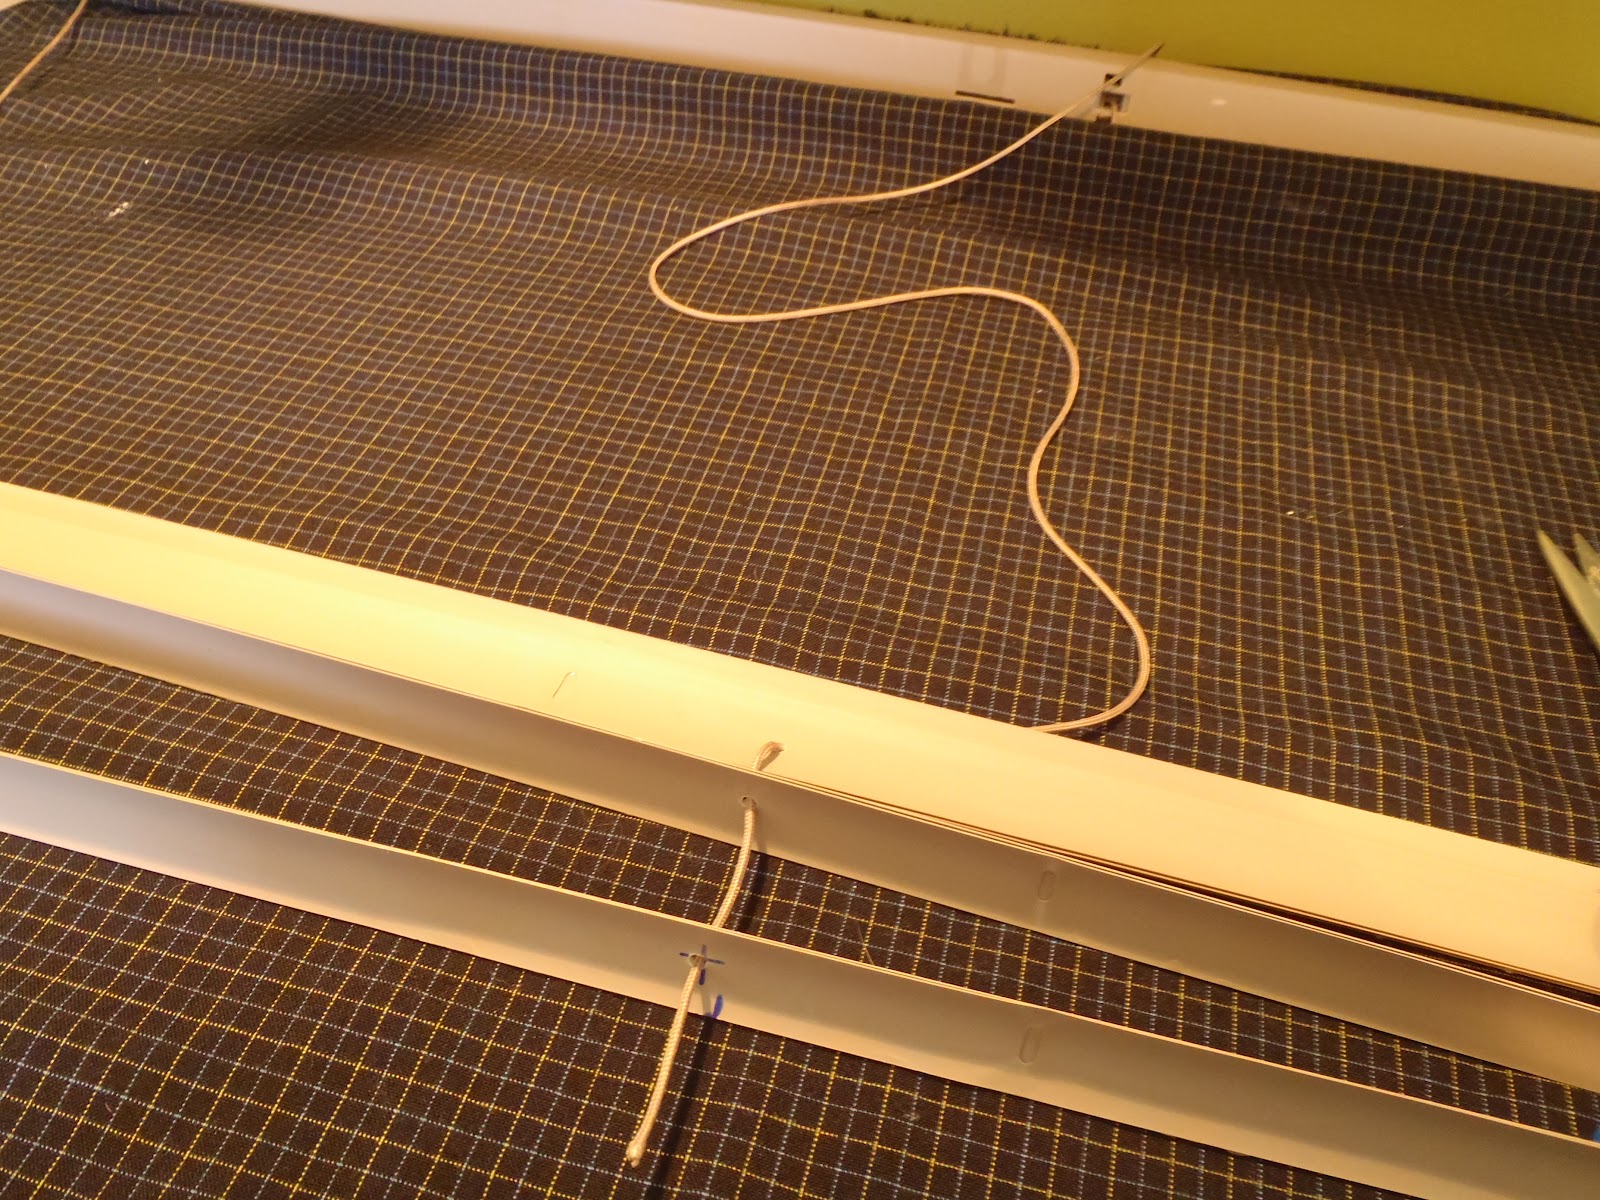
One day I went out with some friends and we went to a second hand store in town and I happened to find a long blind (perfect) for 2.99!! I got it home and quickly measured only to find it was at least 5" to short. So I had the brilliant idea of taking three or four of the metal slats and gluing them together, and then staggering them to make up the extra 5".


I picked my fabric but I didn't want to leave the opposite side exposed (this is the side that faces the exterior) so I picked a second fabric to line the blind with. I had to drill new holes into the slats and this was fairly easy, but in hindsight, I should have drilled elongated holes to allow for more movement.
 Also, one should put the cap back on the sharpie before holding it in one's hand... oops!
I used white glue to start gluing the fabric and slats together and used wooden clothes pegs to hold everything together tightly. I also used heavy objects to help.
 Be careful to not glue the strings down or nothing will work! This is where I had to go back and re-drill the holes a bit larger as I was having problems with the bottom two sections not lowering properly - they go up with no problems.
 I then had to make a little valance to hide the box structure at top of the blinds. I sewed two strips together of each of the fabrics and when I put the end caps up in that valance went at the very top, against the window frame .. ok wait, I didn't do it.. I had to get some help with that part ;)
 Here's how the valance part looked. It just makes for a cleaner look to me.
 And here is the valance in place.... 
So would I do this again? NO! The blind raises properly but when lowering it, the bottom two sections still need 'help'.... perhaps if the blind actually fit the window it might be easier. But it will do for now. It makes the bedroom dark which I love!

Sunday, February 5, 2012

Squee!

I am SO excited!
Squeeeee!

You know how sometimes you read about something online, and then you decide to try it and it doesn't look the same? Well that DIDN'T happen to me today.. well it did and it didn't.. I tried three things today.. one worked well, one did not work well, and the last one ROCKED!

I decided to try to make something that required modge podge (hereafter to be known as MP). I had purchased some good old elmer's glue last week after reading a recipe for MP and mixed some up in an old bottle with pour type spout. This worked great... what I was trying to MP - not so good.

Later in the day I finally relocated the printer into my sewing room. I had read about using freezer paper to transfer images - specifically using the printer to print images onto the freezer paper. This sounded very similar to to when I used to do space planning for Futureshop and would print the shape of the building onto trace paper. I would tape the trace paper to a sheet of 11x17 paper to give the trace the support it needed to go through the printer without tearing. Some people suggest using spray glue but this seems needlessly messy to me.

Anyway!! I found a cool image to try out, printed it out, taped it to a wall in the mudroom (that will be painted in the spring) and voila! It worked like a charm!
Um, except for the fact that I did it upside down.
Lesson learned! Check before starting!

Here is the printed pattern:
Here is the image on the wall:
Here is a close up:
These were taken with my phone as the camera was charging and I got impatient waiting.
What do I want to do with my discovery? It's a secret involving my linen closet. I'll have to do some more experimenting first to make sure the images don't smudge on the wall. Crossing my fingers this works out!

Monday, January 30, 2012

Dreams of Rag Quilts

I've been working on a rag quilt (my first) and I suspect I should have used the old fashioned way for my first one, as opposed to using the template for my GO! Baby by AccuQuilt.While I do love the quickness and ease of cutting the squares out this way, it's made sewing very difficult. Why? Because of the many many fringes that don't want to lay flat! Very annoying, I've picked out seams just as much as I've sewn them! I'm not sure what the answer, my next attempt will involve sitting with the iron. I may also attempt sewing in blocks rather then long rows. Rag quilt = ragged brain cells!


I do have high hopes of it turning out though. The color combinations and patterns are lovely (at least to admittedly poor sight) I've very excited to see what it looks like after washing when the 'rag' part happens! 


I also experimented with sewing circles while doing a small prototype for a small holder for ipod headphones. I saw one on pinterest and decided to try it without the zipper.. but really the zipper might be needed as the way I have sewn it allows gaping.. not good for securing those headphones!
And while I'm doing this, it's finally snowed a bit, making for some lovely tree frosting!

Tuesday, January 10, 2012

It's been some time!

It's been a long haul, painting this house! I've managed to get the majority of it done (though not the trim yet)
I still need window coverings, which is the next step.

We went down to the coast for New Years, though we actually were driving back on New Years Eve. It was a long drive down, but well worth it to see friends and family. We managed to unload the whole storage unit (YAY) and I've almost unpacked all that stuff too!
I've been hit by 'spring cleaning' as well, thought it's not spring - the linen closet has never looked so good!

So here it is, updated photos of the bedroom and my sewing room!


Monday, December 5, 2011

More Paint

Well it seems all I do right now is patch and paint, patch and paint. It's getting exhausted and I'm feeling the need to do some sewing! I've been doing more work in my sewing room, but I'm still needing a work surface. I've contemplated a few styles. This one has some great features. It's got a section I could put my laptop on, and my sewing machine on the return.
L-shaped desk
But I'm tempted to just go with a straight desk and maybe a seperate rolling desk for my laptop.
In the meantime, here are some updated photos of the sewing room and the living room!

My fur closet - fake fur of course! And larger amounts of fabric.

t

Temporary window covering until we figure out what we're doing.


'Flaming June' - had a problem with the hooks on the back so I can't hang it yet.


Organization and a magnet board (and some old sewing projects) New desk will be to the left.


Desk area for cutting fabric with my rotary blade (etc)


One side of the living room. Probably a small dining table will go here.


Main wall of living room.


Dark wall - we'll be getting a flat screen to go on this wall in the new year (because I broke the big tv d'oh)


Other living room corner with my favorite wall art - bought in Scotland, by a Polish artist Wiesław Wałkuski. Check out his work! awesome art here

And of course, my favorite picture of Levy.

Now onto the 'murder' room - who does this?


Sunday, November 20, 2011

New Sewing Room

Well I am using the small bedroom upstairs in the new house for a sewing room. I painted it green - 'baby poo green' is what Todd calls it. Eventually we are redoing all the floors so I must admit that I didn't tape the baseboards because they'll be replaced eventually, and with a much higher base.
So this is what the room looked like originally


And now it looks like this!


now to decide on some window coverings and put the rest of my shelves up!

Tuesday, November 1, 2011

The Ongoing Story of ...

Well we've bought a house - and let me tell you, buying a house is not for the weak of heart! It's ours on November 8th so the next few weeks will be busy packing and moving.
In other news, I've been working away on my Japanese quilt. It's really starting to come together! I love the black strips in between, making it like a window frame.
I'm struggling a bit with squaring the blocks up. I use a rotary blade but they dull so quickly and are so expensive. I did some research and people suggested rolling the blade over foil. I tried it out and I'm really not sure if it made any difference. Perhaps I need to order one of the blade sharpeners I spotted online a well. Or find a place that sells them in bulk!

I also decided to start a rag quilt with a bunch of pink and green fabrics I bought down on the coast. I use my Baby GO! machine from Accuquilt. I really love this machine. For someone with bad wrists it's really helpful but I found myself struggling with the rag quilt die. The threads got stuck in the die and I used tweezers to pull them out all the time. I also had a brand new cutting mat and for some reason the thing wouldn't catch in the roller.. I was getting frustrated. I turned to the accuquilt website and watched some videos with hints. Apparently the threads are fine, you can keep running fabric through and you don't have to clean the threads every single time! I also had only been running two layers of fabric through thinking that was the problem with the mat not catching... but when I put a third layer on it, the darn thing started catching properly! Which of course made my life much easier, as I was able to cut more fabric in a shorter amount of time!


So in two days I've cut all the squares I need and the cotton to go between each layer. Hopefully tomorrow I will be able to sew them all and then it goes in the wash to 'rag'... very exciting!


I've also asked my friend Jane, the amazingly talanted knitter, to knit Casey a sweater for winter.. can't wait to see it!